How to Make Software Tutorial Videos
Every video - whether it’s a tutorial video made in a home office or a $10,000 marketing video shot at a studio - follows the same 3 step process:
Pre-Production → Production → Post-Production
This guide (along with the Video Script Template) walks you through the production process so you can create great tutorial videos in Camtasia with ease.
Pre-Production
This is where you’ll gather the ingredients. Spend quality time in this phase - it can
make the rest of the process as smooth as butter or gritter than grounds in your coffee.
Write A Script
Use the Video Script Template to organize your ideas and create your recipe. Write out what you’ll say along with the visuals, music, sounds effects, and/or text you want to use to illustrate your points. The more detailed, the better - it’ll make the production phase much smoother.
Setup Folder Structure
Don’t let organization be an afterthought! Keep your media organized with a competent folder structure. At a minimum, include a main folder named after your video’s title along with these subfolders: Project File; Graphics; Audio; Final Video.
Start & Save A Camtasia Project
Open Camtasia and create a new project. Immediately save your project file in the Project File folder created above. Make it a habit to save often when you’re creating your work. You can download a trial of Camtasia here.
Production
This is where you’ll mix the ingredients. Let’s start with the first ingredient…
Record The Voiceover
Find a quiet room, use a good microphone, and start cookin’! Your voice is the secret ingredient that gives your video a relatable, human touch. Practice your lines a few times to smooth out any rough edges. When you’re ready:
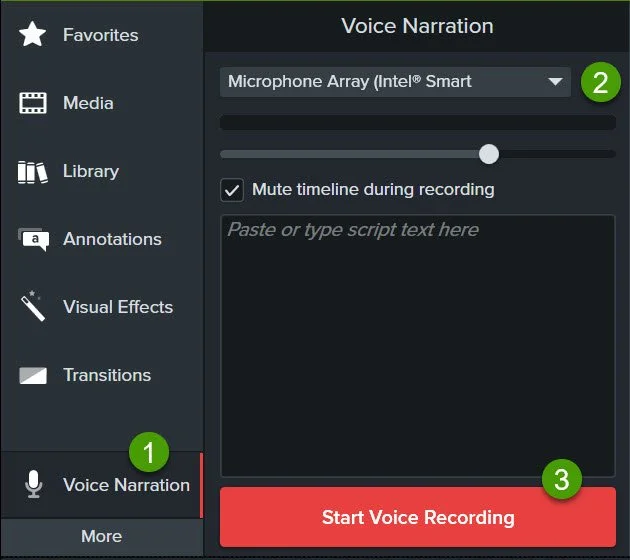
Click Voice Narration
Select your microphone
Click Start Voice Recording
This is the foundation for your entire video.
Record The Screen
You have a choice: record everything in one go or record in chunks. There is no right or wrong approach - if it’s your first time, experiment and see which way you prefer. For a streamlined approach, try recording the voiceover and screen recording together. To record your screen, open the toolbar by clicking Record in the upper-left corner:

1. Select the screen you want to record (or use custom dimensions).
2. Select the camera you want to record (external or built-in webcam).
3. Select the microphone you want to record (optional for voiceover recording).
4. If you want to record sounds from your computer, turn on System Audio.

Assemble The Timeline
Camtasia will automatically place the voiceover on the timeline after it’s recorded. A smart move now is to create Markers on your voiceover to indicate where your screen recording video should start. Do this by:
1. Click View.
2. Select Show Marker Track.
3. Hover over your media on the timeline. When the cross-hairs appear, click to add a Marker.

Repeat this process everywhere on the voiceover where dialogue begins that indicates the start of screen recording narration.

Now we’ll drag-and-drop our screen recording clips from the Media Bin onto the timeline. Use the Markers you created above as your guide.
In this part of the process, your placement doesn’t have to be perfect and you don’t need to edit, splice, or worry about timing.
Just get the ingredients in the bowl for now.
Assemble The Timeline
There are four basic editing tools and techniques in Camtasia that make it the perfect screen recorder/video editor combo. For more information, watch this video.
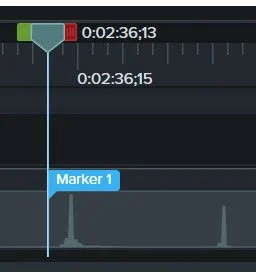
Split


The Split tool cuts your media at the position of the playhead. In the example above, we split the voiceover media after Marker 1, detaching the left and right halves of the voiceover. We can now adjust the position of the media on the right without affecting the timing of the media on the left.
○ Trim
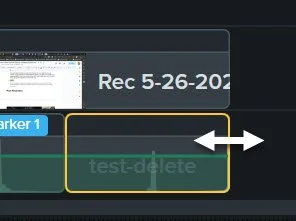

Trimming allows you to either hide or reveal parts of your media. In the example above, the Trim tool (double-arrow) appears when you hover over the end of a piece of media on the timeline. Click, hold, and drag the media to the left or right to hide or reveal your media.
○ Frame Hold
Use the Frame Hold when you want a particular image to appear on screen for an extended period of time. This feature takes a frame from your video and freezes it, allowing you time to provide an in-depth explanation in your voiceover or use annotations to add context & clarity.
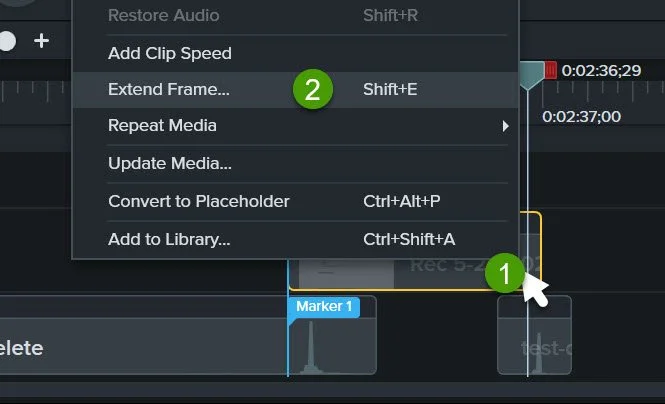
To use Frame Hold, position the playhead over the frame you want to freeze and:
Right-Click the video.
Click Extend Frame…(or press Shift+E).
Input the number of seconds you would like the frame to hold.
Click OK.
○ Zoom
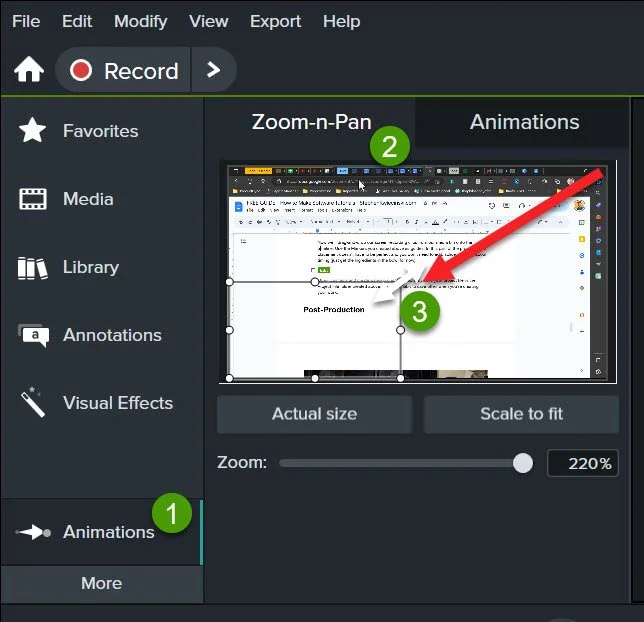
Zoom animations let you shift the viewer’s attention to a specific part of the screen (e.g. showing the submit button in the lower-left corner of the app).
Imagine this: you’re watching a tutorial video and the scene cuts from a view of the full screen to a shot of a button. With a cut like this , the viewer may get confused and not know where the button you’re showing is located. With a zoom, you allow the viewer to orient themselves within the app and provide context for where the button exists.
Be careful not to overuse the Zoom! Too much movement could give your viewers motion sickness.

To add Zoom:
Select Animations.
Select Zoom-n-Pan.
Adjust the size of the bounding box from full-screen to fit the focus area.
You’ll notice an arrow appears on your media on the timeline to indicate the start and end points for your Zoom animation. To zoom out, repeat the process on a later part of your clip to add a second Zoom animation.
Post-Production
Your ingredients are mixed - time to cook!
Assemble The Timeline
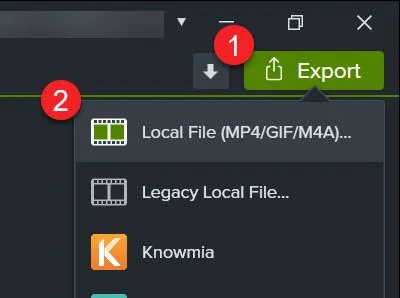
Let’s cook - to export:
Click Export.
Select Local File.
Select your preferred File Type.
Name your file.
Browse your computer and select the Final folder in the structure you created earlier.
Click Advanced > Encoding.
Set the quality to 75%.
Click Export.
Depending on the complexity of your edit, the length of the video, and the speed of your computer, the export can take anywhere from a few minutes to a few hours. Be patient - the results are worth it!

Review
Open a Google Doc or notepad - it’s time to take notes! Watch your video and write down what you like, what you don’t like and what you think could be improved. Is the timing off? Is the volume too loud or too quiet? Is all the spelling correct? This is your chance to review your work and develop your director’s eye.
Assemble The Timeline
Open your Camtasia project and make the changes you identified in the previous step. You may need to record the screen again or correct a voiceover mistake. Make your changes and run through the export process. Use a naming convention that lets you keep track of the changes made across versions (e.g. Final-v01.mp4, Final-v02.mp4, Final-v03.mp4, etc.).
Repeat
Time for another review! Check your notes and watch your video - are you satisfied with the changes? Is there anything else? If the video looks good, that’s a wrap! If not, head back to the previous step for more refining.
Now you’re ready to create tutorial videos!
Hungry For More?
Let’s create your videos together!
